Setting an E5CC/E5EC Temperature Controller using PID Control
Introduction
The purpose of this step-by-step guide is to provide a clear method for the set-up of an E5CC or E5EC temperature controller using the PID control method.
Procedure
Determine the Control Method Details
Step 1: Select Reverse or Direct Operation
Determine if the application in which the temperature controller will be used requires reverse or direct operation.
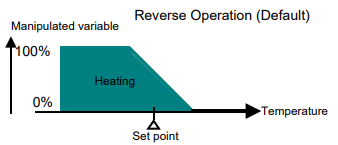
For clarity, reverse operation is when the temperature controller increases the manipulated variable if the temperature is lower than the set point, and decreases the manipulated variable if the temperature is higher than the set point, as shown below.

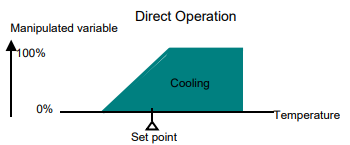
Direct operation is when the temperature controller increases the manipulated variable if the temperature is higher than the set point, and decreases the manipulated variable if the temperature is lower than the set point, as shown below.

Essentially, reverse operation is used for heating, while direct operation is used for cooling. Note that reverse operation is the default setting for the temperature controller.
Step 2: Select the Method of Setting the PID Constants
The PID constants can be set in three different ways, depending on the application and conditions of the overall system when the PID Control method is being programmed.
In order to determine the best method for the application, consult the table below.
| Situation | Method for Setting the PID Constants |
| The temperature is allowed to vary during tuning. The optimum PID constants are unknown and require calculation. |
Auto-tuning (AT) |
| The PID constants are known. | Set the PID constants manually. |
| The temperature is not allowed to vary during tuning. The optimum PID constants are unknown and require calculation. There are no external sources of potential temperature changes (such as a heater turning on or off). |
Self-tuning (ST) |
Step 3: Setting the Set Point
From the operating display, press the up and down arrows to modify the set point value.
The new set point value will be selected and used 3 seconds after the value is specified.
Note that this method of setting the set point value may change depending on key protection parameters. Please refer to the appropriate temperature controller User's Manual for details on how to change a protected set point, or the key protection level.
Setting the Control Parameters
Step 1: Setting PID Control
Turn on the temperature controller.
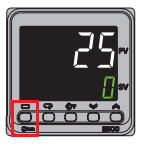
Press the level button for 3 seconds. Thus button is shown in the below image, and labelled with a rectangle on the temperature controller.

This will show the 'IN-T' initial setting menu. Press the mode button several times to display 'CNTL', which is the control method parameter. This button is labelled with the below symbol.

By default, this parameter is set to 'ONOF'. Press the up arrow to change this to 'PID'.
Press the mode button several times to display the 'ST' parameter, which is the self-tuning parameter. By default, this parameter is set to ON. If self-tuning is to be used as the method for setting the PID constants, leave this parameter as ON. If autotuning or manually setting the PID constants is required, use the up and down arrows to set this parameter to OFF.
Step 2: Setting Reverse or Direct Operation
Remaining in the initial setting menu, press the mode button several times to display 'OREV', which is the direct/reverse operation parameter.
The default value for this parameter is 'OR-R', which is for reverse operation. The alternative, direct operation, uses the value of 'OR-D'.
To change between reverse and direct operation, press the up and down arrow buttons until the desired operation mode is selected.
Press the level button for 1 second to return to the operation display.
Step 3: Setting the Set Point
From the operating display, press the up and down arrows to modify the set point value.
The new set point value will be selected and used 3 seconds after the value is specified.
Note that this method of setting the set point value may change depending on key protection parameters. Please refer to the appropriate temperature controller User's Manual for details on how to change a protected set point, or the key protection level.
Tuning
Auto-tuning Process
From the operation display of the temperature controller, press the level button for less than 1 second. This will display 'L.ADJ', indicating that the adjustment level has been entered.
Press the mode button several times to display 'AT', which represents the autotuning parameter, which has a default value of OFF.
Press the up and down arrow buttons to select the new value as 'AT-2', which represents 100% autotuning. Note that a value of 'AT-1' can be selected, but this represents 40% autotuning, which is potentially a more time-consuming process. If 100% autotuning does not provide the desired results, attempt autotuning at the 40% level.
The 'TUNE' indicator on the temperature controller's display will light up during the tuning process. When it goes out, the autotuning process is finished.
Once the process is finished, press the level button to return to the operation display.
DeleteManual Setting of PID Constants Process
Form the operation display of the temperature controller, press the level button for less than 1 second. This will display 'L.ADJ', indicating that the adjustment level has been entered.
Press the mode button several times to display 'P', which represents the proportional band parameter, which has a default value of 8.0 degrees Celsius.
Press the up and down arrow buttons to select the required value.
Once the proportional band parameter is set, press the mode button several times to display 'I' (or 'i'), which represents the integral time parameter, which has a default value of 223 seconds.
Press the up and down arrow buttons to select the required value.
Once the integral time parameter is set, press the mode button several times to display 'D' (or 'd'), which represents the derivative time parameter, which has a default value of 40 seconds.
Press the up and down arrow buttons to select the required value.
When finished, press the level button to return to the operation display.
DeleteSelf-Tuning Process
Self-tuning is an automatic process that occurs when the temperature controller begins it's operation, or if the set point is changed. There is no need to change any further parameters on the temperature controller to enable Self-tuning.
Note that when using Self-tuning, the power for the load must be switched on at the same time or before the temperature controller is switched on. If the load is switched on after the temperature controller, Self-tuning will not be properly executed, and the temperature control will not be optimal.
Delete