Setting an E5CC/E5EC Temperature Controller using ON/OFF Control

Written by Brett Hook
Updated at March 6th, 2023
Introduction
The purpose of this step-by-step guide is to provide a clear method for the set-up of an E5CC or E5EC temperature controller using the ON/OFF control method.
Procedure
Determine the Control Method Details
Step 1: Select Reverse or Direct Operation
Determine if the application in which the temperature controller will be used requires reverse or direct operation.
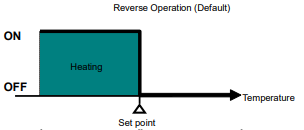
For clarity, reverse operation is when the temperature controller turns ON the output if the temperature is lower than the set point, and turns OFF the output if the temperature is greater than the set point, as shown below.
Direct operation is when the temperature controller turns ON the output if the temperature is greater than the set point, and turns OFF the output if the temperature is lower than the set point, as shown below.
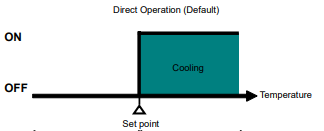
Essentially, reverse operation is used for heating, while direct operation is used for cooling. Note that reverse operation is the default setting for the temperature controller.
Step 2: Determine the Set Point
Determine the temperature value which the temperature controller is to achieve for the application. This value must be within the temperature sensing range of the connected sensor.
Step 3: Determine the Hysteresis
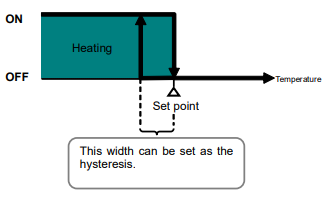
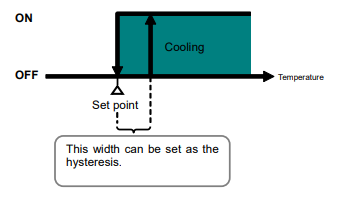
To avoid rapid switching behaviour, ON/OFF control utilises a hysteresis, or reset width, for both reverse or direct operation. This means that once the temperature controller's output has switched OFF due to reaching the set point, for the output to be switched back to ON, the temperature must pass the set point by the magnitude of the hysteresis value.
For reverse (heating) operation, see the below image for details of the hysteresis' operation.
For direct (cooling) operation, see the below image for details of the hysteresis' operation.
Note that the default value for the hysteresis is 1.0 degree Celsius.
Setting the Control Parameters
Step 1: Setting ON/OFF Control
Turn on the temperature controller.
Press the level button for 3 seconds to enter Initial Setting Level . This button is shown in the below image, and is labelled with a rectangle on the temperature controller.
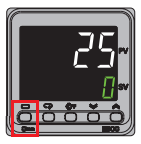
This will show the 'IN-T' initial setting menu. Press the mode button several times to display 'CNTL', which is the control method parameter. This button is labelled with the below symbol.

By default, this parameter is set to 'ONOF', or ON/OFF control. However, if 'PID' is displayed for this parameter, press the down arrow button to change it to 'ONOF'.
Remain in the initial setting menu.
Step 2: Setting Reverse or Direct Operation
Remaining in the initial setting menu, press the mode button several times to display 'OREV', which is the direct/reverse operation parameter.
The default value for this parameter is 'OR-R', which is for reverse operation. The alternative, direct operation, uses the value of 'OR-D'.
To change between reverse and direct operation, press the up and down arrow buttons until the desired operation mode is selected.
Press the level button for 1 second to return to the operation operation level.
Step 3: Setting the Set Point
From the operating display, press the up and down arrows to modify the set point value.
The new set point value will be selected and used 3 seconds after the value is specified.
Note that this method of setting the set point value may change depending on key protection parameters. Please refer to the appropriate temperature controller User's Manual for details on how to change a protected set point, or the key protection level.
Step 4: Setting the Hysteresis
From the operating display, press the level button for less than 1 second.
This will display 'L.ADJ' to indicate that the adjustment level of the temperature controller has been entered.
Press the mode button several times to display 'HYS', which is the hysteresis parameter.
The default value of 1.0 (degrees Celsius) is displayed beneath the parameter name. Use the up and down arrow buttons to modify the value as required.
Press the level button to return to the operation level.