Setting the Sensor Type on E5CC/E5EC Temperature Controllers
Scenario
During installation of an E5CC or E5EC temperature controller, the correct sensor type must be selected for the controller to process the input data and present the appropriate temperature values as a result.
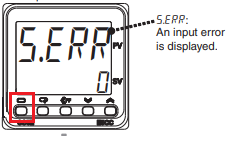
Alternatively, during installation or operation, if the scenario of the 'S.ERR' input error appearing on the temperature controller occurs, or if the temperature displayed is not correct.
Issue
In the case of an 'S.ERR' input error occurring, the issue is that the connected temperature sensor does not agree with the input type parameter in the temperature controller, or that the sensor is not connected.
In the case of an incorrect temperature being displayed, it is likely that the connected sensor is a thermocouple of a type different to that set in the temperature controller.
Solution
To set or correct the input type parameter in the temperature controller, first determine the type of temperature sensor that is to be used. This can normally be done with the documentation that came with the temperature controller.
Once the type of the temperature sensor is determined, consult the following table to determine the value that will be used for the input type parameter. Note that several of the sensor types have multiple possible values, which correspond to different temperature ranges and decimal places. Ensure that the temperature range to be used includes the expected and desired temperatures of the application.
Input Type |
Sensor Type |
Input Temperature Setting Range (C)
|
Input Temperature Setting Range (F) |
E5CC/E5EC Input Type Parameter Value |
| Resistance Thermometer | Pt100 |
-200 to 850 C |
-300 to 1500 F | 0 |
| -199.9 to 500.0 C | -199.9 to 900.0 F | 1 |
||
| 0.0 to 100.0 C | 0.0 to 210.0 F | 2 |
||
JPt100 |
-199.9 to 500.0 C | -199.9 to 900.0 F | 3 |
|
| 0.0 to 100.0 C | 0.0 to 210.0 F | 4 |
||
| Thermocouple | K |
-200 to 1300 C | -300 to 2300 F | 5 (Default Value) |
| -20.0 to 500.0 C | 0.0 to 900.0 F | 6 |
||
J |
-100 to 850 C | -100 to 1500 F | 7 |
|
| -20.0 to 400.0 C | 0.0 to 750.0 F | 8 |
||
T |
-200 to 400 C | -300 to 700 F | 9 |
|
| -199.9 to 400.0 C | -199.9 to 700 F | 10 |
||
E |
-200 to 600 C | -300 to 1100 F | 11 |
|
L |
-100 to 850 C | -100 to 1500 F | 12 |
|
U |
-200 to 400 C | -300 to 700 F | 13 |
|
| -199.9 to 400.0 C | -199.9 to 700.0 F | 14 |
||
N |
-200 to 1300 C | -300 to 2300 F | 15 |
|
R |
0 to 1700 C | 0 to 3000 F | 16 |
|
S |
0 to 1700 C | 0 to 3000 F | 17 |
|
B |
100 to 1800 C | 300 to 3200 F | 18 |
|
W |
0 to 2300 C | 0 to 3200 F | 19 |
|
PLII |
0 to 1300 C | 0 to 2300 F | 20 |
Once the input type parameter has been determined, the method for setting it in the temperature controller is as follows.
- Turn on the power supply for the temperature controller. If the sensor is not currently connected, connect it now.
- Press the level button, which is marked with the rectangle symbol, for 3 seconds.

- This will cause the temperature controller to display 'IN-T' on the larger display line, and a number (default of 5) on the smaller display line. This is the input type parameter.
- Use the up and down arrow buttons to change the value of the input type parameter until it matches the desired value.
- Press the level button for 1 second to return to the operation display.