Setting Temperature Alarms on an E5CC/E5EC Temperature Controller
Introduction
The purpose of this step-by-step guide is to provide a clear method setting a temperature alarm on an E5CC or E5EC temperature controller, including how to determine to required alarm type and how the make the required settings in the temperature controller itself.
Procedure
Determine the Alarm Type and Characteristics
Step 1: Selecting the Alarm Type
In order to properly select the alarm type, navigate the following sequence of questions.
-
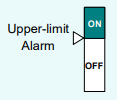
Output an alarm when the temperature exceeds a specific value
-
Output an alarm when the temperature goes below a specific value
-
Output an alarm when the temperature goes below a specific value or exceeds a specific value
-
Output an alarm when the temperate is within a specific range
- Add Button
Does the alarm temperature need to be linked to the temperature set point?
-
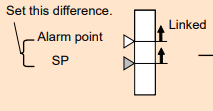
Yes, it is required that the value of the alarm temperature changes to follow the set point
-
No, the value of the alarm temperature will be an absolute and unchanging value
- Add Button
Does the alarm need to be armed when the system is first powered on?
-
No, the temperature of the system is expected to be within the alarm ON range when started
-
Yes, the temperature of the system is expected to be within the OFF range when started
- Add Button
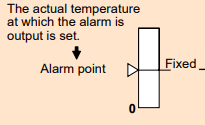
This should only be used if the temperature is expected to initially be in the ON region, such as a cooling system that starts at room temperature, where the alarm is intended to provide an alert if the temperature increases to a certain level above the set point.
The proper alarm type for this application is an Upper-Limit Alarm with Standby Sequence.
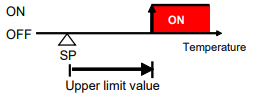
This should only be used if the system is expected to initially be in the OFF region, such as on a heating system that starts at room temperature, where the alarm is intended to provide an alert if the temperature increases to a certain amount above the set point.
The proper alarm type for this application is an Upper-Limit Alarm.
Does the alarm need to be armed when the system is first powered on?
-
No, the temperature of the system is expected to be within the alarm ON range when started
-
Yes, the temperature of the system is expected to be within the OFF range when started
- Add Button
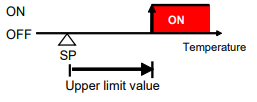
This should only be used if the temperature is expected to initially be in the ON region, such as a cooling system that starts at room temperature, where the alarm is intended to provide an alert if the temperature increases above an absolute value.
The proper alarm type for this application is an Absolute-Value Upper-Limit Alarm with Standby Sequence.

This should only be used if the system is expected to initially be in the OFF region, such as on a heating system that starts at room temperature, where the alarm is intended to provide an alert if the temperature increases above an absolute value.
The proper alarm type for this application is an Absolute-Value Upper-Limit Alarm.

Does the alarm temperature need to be linked to the temperature set point?
-
Yes, it is required that the value of the alarm temperature changes to follow the set point
-
No, the value of the alarm temperature will be an absolute and unchanging value
- Add Button
Does the alarm need to be armed when the system is first powered on?
-
No, the temperature of the system is expected to be within the alarm ON range when started
-
Yes, the temperature of the system is expected to be within the OFF range when started
- Add Button
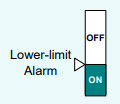
This application requires a standby sequence, which means that the alarm will not activate the first time that the temperature enters the ON region, but will activate on second and subsequent events where the temperature enters the ON region.
This should only be used if the temperature is expected to initially be in the ON region, such as a heating system that starts at room temperature, where the alarm is intended to provide an alert if the temperature decreases to a certain level below the set point.
The proper alarm type for this application is a Lower-Limit Alarm with Standby Sequence.

This application does not require a standby sequence, which means that the alarm will be ready to be triggered as soon as the system is powered on.
This should only be used if the system is expected to initially be in the OFF region, such as on a cooling system that starts at room temperature, where the alarm is intended to provide an alert if the temperature decreases to a certain amount below the set point.
The proper alarm type for this application is a Lower-Limit Alarm.


Does the alarm need to be armed when the system is first powered on?
-
No, the temperature of the system is expected to be within the alarm ON range when started
-
Yes, the temperature of the system is expected to be within the OFF range when started
- Add Button
This application requires a standby sequence, which means that the alarm will not activate the first time that the temperature enters the ON region, but will activate on second and subsequent events where the temperature enters the ON region.
This should only be used if the temperature is expected to initially be in the ON region, such as a heating system that starts at room temperature, where the alarm is intended to provide an alert if the temperature decreases below an absolute value.
The proper alarm type for this application is an Absolute-Value Lower-Limit Alarm with Standby Sequence.

This application does not require a standby sequence, which means that the alarm will be ready to be triggered as soon as the system is powered on.
This should only be used if the system is expected to initially be in the OFF region, such as on a cooling system that starts at room temperature, where the alarm is intended to provide an alert if the temperature decreases below an absolute value.
The proper alarm type for this application is an Absolute-Value Lower-Limit Alarm.

Does the alarm temperature need to be linked to the temperature set point?
-
Yes, it is required that the value of the alarm temperature changes to follow the set point
-
No, the value of the alarm temperature will be an absolute and unchanging value
- Add Button

Does the alarm need to be armed when the system is first powered on?
-
No, the temperature of the system is expected to be within the alarm ON range when started
-
Yes, the temperature of the system is expected to be within the OFF range when started
- Add Button
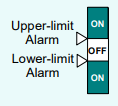
This application requires a standby sequence, which means that the alarm will not activate the first time that the temperature enters the ON region, but will activate on second and subsequent events where the temperature enters the ON region.
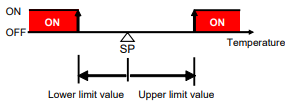
This should only be used if the temperature is expected to initially be in the ON region, such as a cooling system that starts at room temperature, where the alarm is intended to provide an alert if the temperature increases to a certain level above the set point, or decreases to a certain level below the set point.
The proper alarm type for this application is an Upper-Limit and Lower-Limit Alarm with Standby Sequence.
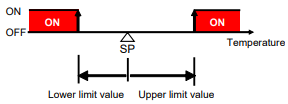
This application does not require a standby sequence, which means that the alarm will be ready to be triggered as soon as the system is powered on.
This should only be used if the system is expected to initially be in the OFF region, such as on a climate control system that is intended to maintain the system at room temperature, where the alarm is intended to provide an alert if the temperature increases to a certain amount above the set point or decreases to a certain amount below the set point.
The proper alarm type for this application is an Upper-Limit and Lower-Limit Alarm.

Does the alarm temperature need to be linked to the temperature set point?
-
Yes, it is required that the value of the alarm temperature changes to follow the set point
-
No, the value of the alarm temperature will be an absolute and unchanging value
- Add Button

Does the alarm need to be armed when the system is first powered on?
-
No, the temperature of the system is expected to be within the alarm ON range when started
-
Yes, the temperature of the system is expected to be within the OFF range when started
- Add Button
This application requires a standby sequence, which means that the alarm will not activate the first time that the temperature enters the ON region, but will activate on second and subsequent events where the temperature enters the ON region.
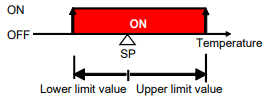
This should only be used if the temperature is expected to initially be in the ON region, such as a system that starts at a certain temperature, where the alarm is intended to provide an alert if the temperature enters a range around the set point that includes that initial temperature.
The proper alarm type for this application is an Upper-Limit and Lower-Limit Range Alarm with Standby Sequence.
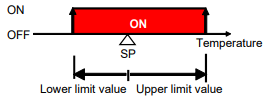
This should only be used if the temperature is expected to initially be in the OFF region, such as a system that starts at a certain temperature, where the alarm is intended to provide an alert if the temperature enters a range around the set point that does not include that initial temperature.
The proper alarm type for this application is an Upper-Limit and Lower-Limit Range Alarm.
Step 2: Determine the Alarm Value
There are two methods to set the temperature at which the alarm is output, depending on whether the alarm type is using absolute values, or if it is following the set point.
Note that regardless of the alarm type, the alarm value can use positive or negative values.
Setting the Alarm Value for a Following Alarm Type
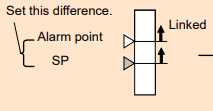
For alarms that follow the set point, the alarm value is the number of degrees Celsius that the alarm point differs from the set point, in the direction of the ON region.
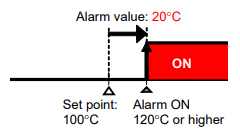
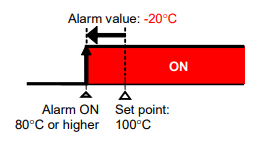
For Upper-Limit alarms, this means that a positive alarm value results in an alarm point at a higher temperature than the set point, while a negative alarm value results in an alarm point at a lower temperature than the set point. Note that a negative alarm value includes the set point in the ON region of the alarm.
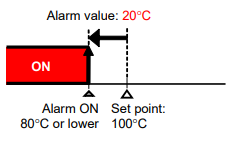
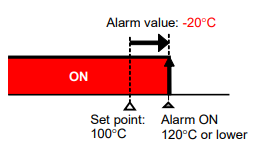
For Lower-Limit alarms, this means that a positive alarm value results in an alarm point at a lower temperature than the set point, while a negative alarm value results in an alarm point at a higher temperature than the set point. Note that a negative alarm value includes the set point in the ON region of the alarm.
For Upper-Limit and Lower-Limit alarms, an upper and lower limit can be set individually, and function in the same manner as the individual Upper-Limit and Lower-Limit alarms described above.
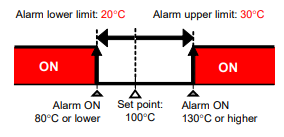
Setting the Alarm Value for Absolute-Value Alarm Types
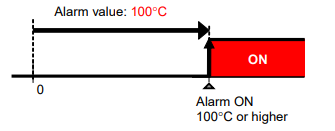
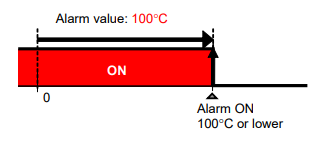
For alarms that use an absolute-value, the alarm value is the absolute value in degrees Celsius where the alarm will output an ON signal.
For Upper-Limit alarms, the alarm value is the temperature which if exceeded, causes the alarm to output ON, no matter what the set point is.
For Lower-Limit alarms, the alarm value is the point which if the temperature falls below, will cause the alarm to output ON, no matter what the set point is.
Note that there is no Upper-Limit and Lower-Limit alarm type that utilises absolute values.
DeleteSetting the Alarm Parameters
Step 1: Setting the Alarm Type
Turn on the Temperature Controller.
Press the level button for 3 seconds. This button is shown in the below image, and is labelled with a rectangle on the temperature controller.
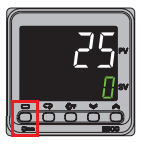
This will show the 'IN-T' initial setting menu. Press the mode button, pictured below, several times to display 'Alt 1', which is the Alarm 1 parameter and has a default value of 2.

Use the up and down arrow buttons to select the appropriate numerical value for the previously determined alarm type. Check the below table for the numerical values associated with each alarm type.
Alarm Type |
Parameter Value |
| No Alarm |
0 |
| Upper-Limit and Lower-Limit Alarm |
1
|
| Upper-Limit Alarm | 2 |
| Lower-Limit Alarm | 3 |
| Upper-Limit and Lower-Limit Range Alarm | 4 |
| Upper-Limit and Lower-Limit Alarm with Standby Sequence | 5 |
| Upper-Limit Alarm with Standby Sequence | 6 |
| Lower-Limit Alarm with Standby Sequence | 7 |
| Absolute-Value Upper-Limit Alarm | 8 |
| Absolute-Value Lower-Limit Alarm | 9 |
| Absolute-Value Upper-Limit Alarm with Standby Sequence | 10 |
| Absolute-Value Lower-Limit Alarm with Standby Sequence | 11 |
If required, use the mode key to select additional alarms (ALT 2, ALT 3 and so on), and the up and down arrow buttons to select the appropriate alarm type.
Note that the number of available alarms depends on the model of the temperature controller.
When finished, press the level button for 1 second to return to the operation display.
Step 2: Setting the Alarm Value
Setting an Alarm with a Single Value
This process is used for the alarm types that only possess a single alarm value to set (Alarm Types 2, 3, 6, 7, 8, 9, 10 or 11).
From the operation display, press the mode button several times to display AL-1 or the desired alarm (AL-X, where X is the number of the alarm).
Use the up and down arrow buttons to set the alarm value in degrees Celsius.
Press the mode button to return to the operation display.
DeleteSetting an Alarm with Two Values
This process is used for the alarm types that possess two alarm values to set (Alarm Types 1, 4 or 5).
From the operation display, press the mode button several times to display AL1H, or the desired alarm's upper limit (ALXH, where X is the number of the alarm).
Use the up and down arrow buttons to set the alarm value in degrees Celsius.
Press the mode button several times to display AL1L, or the desired alarm's lower limit (ALXL, where X is the number of the alarm).
Use the up and down arrow buttons to set the alarm value in degrees Celsius.
When finished, press the mode key to return to the operation display.
DeleteAdditional Alarm Settings
Alarm Hysteresis
Alarm hysteresis is the difference between the temperature where the alarm output turns ON and the temperature where it turns OFF. The default is 0.2 degrees Celsius.
To change this setting, from the operation display press the level button for 3 seconds to enter the initial setting menu, shown by 'IN-T' on the display.
Press the mode button several times to display 'ALH1', which is Alarm 1's hysteresis parameter. For other alarms, the parameter is ALHX, where X is the alarm number.
Press the up and down arrow buttons to change the value of the hysteresis, in degrees Celsius.
When finished, press the level key for 1 second to return to the operation display.
Delete