Optimising Ethernet/IP Tag Sets with CX-One's Network Configurator
Resolving connection resource issues
Scenario
When using Ethernet/IP communications between PLCs and other devices, where the PLCs have been configured using CX-One's Network Configurator, you have encountered a ‘Comparison Error’, and your communications are failing.
You may even be experiencing ‘chasing’ behaviour, where you resolve one node's error by resetting it, but then the error reoccurs in additional nodes.
Issue
The issue at hand is likely to be due to connection resources not being sufficient, which explains the ‘chasing’ behaviour of the error, as resetting a node temporarily reduces the usage of those resources before overloading them again.
This is typically due to using too many Tags or Tag Sets for the connection.
Solution
Resolving the underlying issue with the Tags or Tag Sets will require reconfiguring the Ethernet/IP settings on all of the devices using the problematic connections. If there are multiple connections, it is important to diagnose which of them are causing the issue.
Connect to the network using Network Configurator, ensuring that the network details are uploaded to your computer.
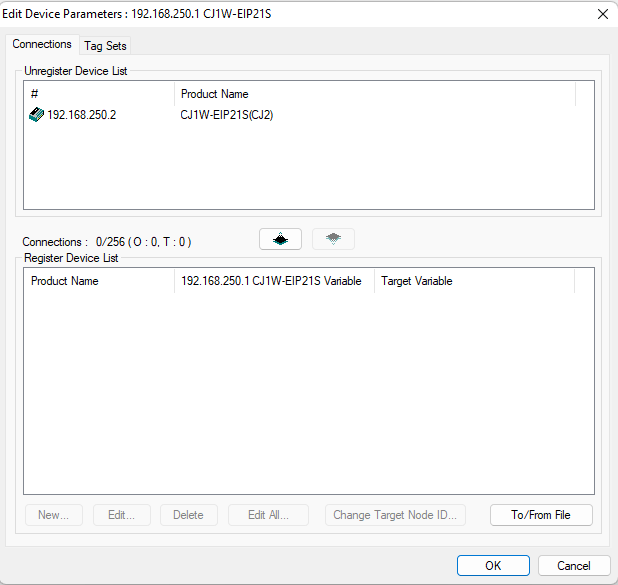
Double-click on any of the listed devices in the network to open the Edit Device Parameters window:

This window shows us the connections and Tag Sets that involve the selected device. On this page we can also see how many connections are present, and the maximum number that are allowed. Depending on your network infrastructure and other environmental considerations, the issue previously described can occur without the number of connections reaching the maximum.
If the issue is occurring without reaching the maximum, it's likely that we need to optimise the connections.
In the list of the connections, the IP address of each connected device is presented under the ‘Product Name’ header. Check through this list for the same IP address, and note down when this occurs, as well as the names of the Tag Sets under the two variable headers.
Click back to the Tag Sets section of the Device Parameter window, using the tabs at the top of the window.
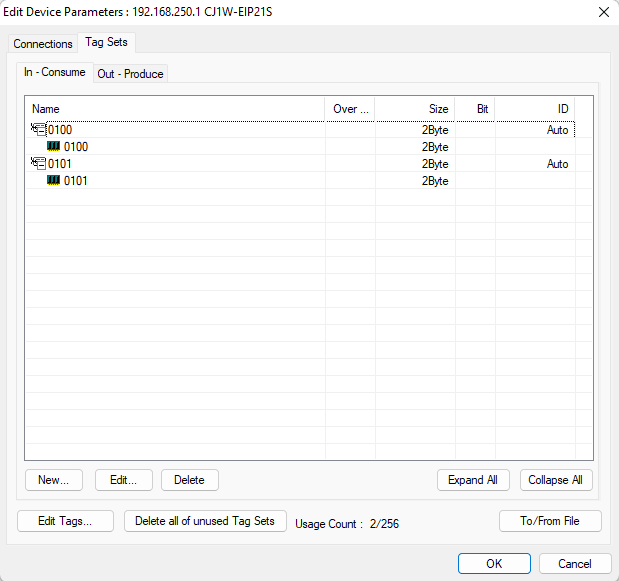
In this section, look for the Tag Sets that were used in the connections with the same IP address. Expand them to view the Tags in these Tag Sets, if they were not already visible. You should see a similar table to the below image:

From here, we can see that there are two Tag Sets and two Tags, with one Tag per Tag Set. We are also going to assume that these Tag Sets are being used in two different connections to the same device.
To optimise this, we will consolidate the Tag Sets, such that the two Tags are in a single Tag Set, meaning that we only need one connection to the device.
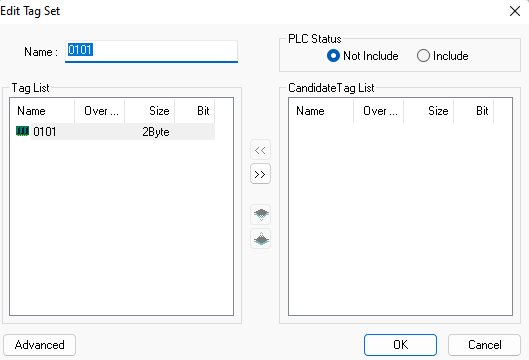
To do this for this example, select the Tag Set named ‘0101’ and click ‘Edit’. This will open the Edit Tag Set window, as below:

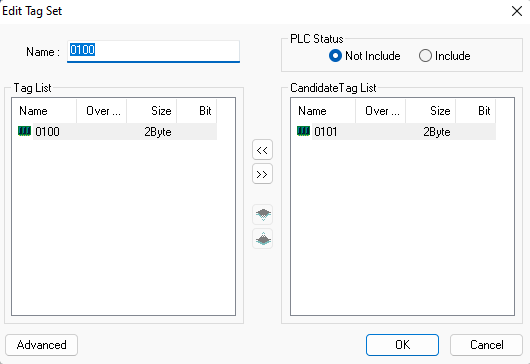
Select the Tag, also named ‘0101’ in the Tag List, and click the ‘>>’ button to move it to the Candidate Tag List. Click OK, and the Tag Set will be deleted automatically. Now select the Tag Set named ‘0100’ and click Edit, which will open the Edit Tag Set window again, as below:

Select the Tag named ‘0101’ in the Candidate Tag List and click the ‘<<’ button to add it to the Tag List. Click OK, and you will see that both Tags are now in a single Tag Set.
If we click back to our Connections section (using the tabs at the top of the window), we may see that some of our connections have missing Tag Sets. These connections should be deleted.
Repeat this process on all of the devices on the network, ensuring that the Tag Sets and Tags on each device match those that they are paired with, then download the settings to the network. The process is now finished.
Optimisation of Tag Sets is achieved when we have a single connection between the PLC and the other device. Unless recommended by the manufacturer of the other device, it is advisable to avoid multiple connections between two devices on a network.